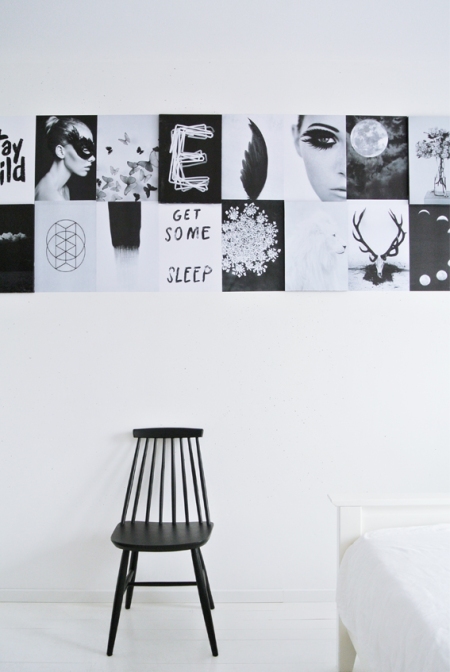
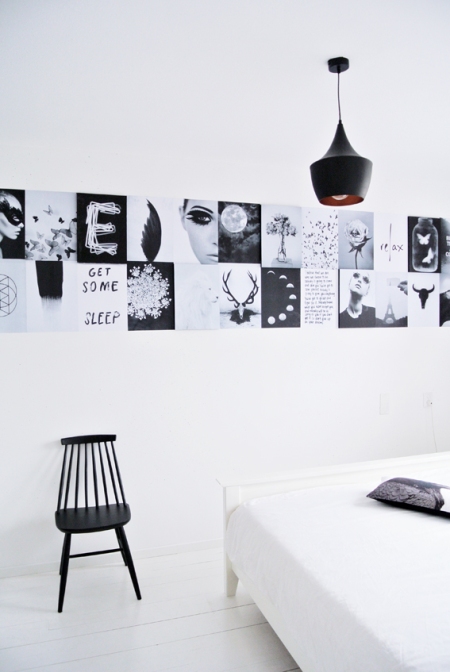
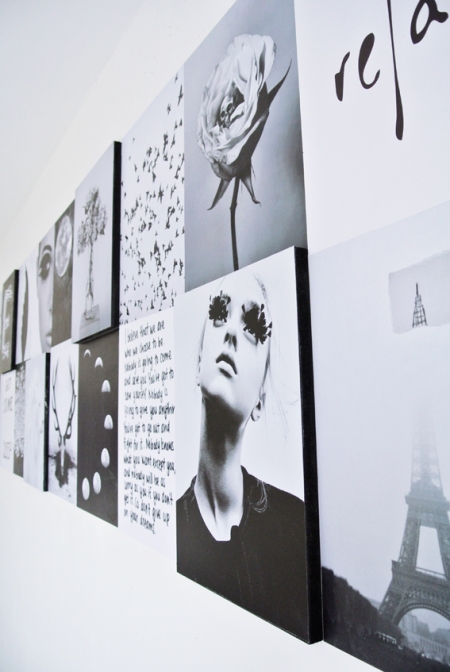
Marij Hessel from the lovely blog My Attic, made her own photo collage on her bedroom wall. She collected her favorite black and white pictures from Pinterest, attached some directly on the wall and some on an MDF panel, for a nice 3D effect. I think this is just gorgeous, and such a good idea !
—
Marij Hessel, schrijfster van de leuke blog, My Attic maakte deze mooie fotocollage voor haar slaapkamer muur. Voor deze collage gebruikte ze inspirerende zwart wit foto’s van Pinterest. Sommige van deze foto’s plaatste ze rechtstreeks op de muur, andere eerst op een vezelplaat, voor een leuk 3D effect. Een heel leuk idee met een prachtig effect. Ik zou zo ook wel een muur in mijn slaapkamer willen !
I guess everybody is (or will be) very busy buying and wrapping Christmas presents these days, so I tought I would share a DIY I tried out on my Christmas presents this year. I bought wooden stars in the craft store and drilled two holes in each of them. Wrap your present, put your ribbon through the holes in the stars, turn it around the present and make a small knot behind the star, so it will be hidden. Happy wrapping !
Christmas is getting so much closer now, but I’m still enjoying making some decorations for around the house. I made this garland with black Christmas trees I cut out of paper, which I sewed together with some black thread.
It’s always nice to attach a card to a Christmas present and what better way to do it than in a self-made envelope ? I decided to keep it simple and used marble and concrete texture prints. I cut out the four corners of the paper and folded the flaps. For the closure on the back, I used a black dot sticker. On the front I attached a little message with a Masking Tape.
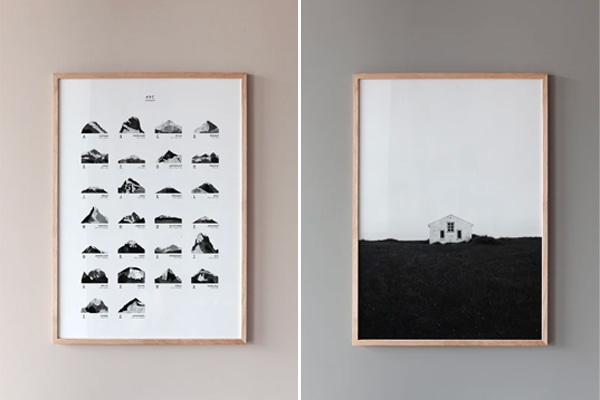
The Dutch stylist Femke Pastijn makes the nicest compostions. I was drawn to some of the styling she did for two Dutch magazines about trends. On here website you can find a lot of Diy projects and interiors as well. Worth a visit !
The pictures below are all styled by Femke Pastijn and taken by Dennis Brandsma, Jeroen van der Spek en Dana van Leeuwen.
This weekend I made this bench cushion, inspired by the Pia Wallen blanket that’s so popular nowadays. First I made a square quilt top and after I constructed it into a pillow.
I made it for the Molger bench from Ikea, but with a little bit of adjustments in size, it should be possible to make for any kind of bench or chair.
The materials you will need for this tutorial:
– Two colors of cotton (I used about 1m black and 20cm white)
– Foam for the inside of the pillow (2 cm thickness)
– Ruler, scissors and threaded sewing machine
– Zipper (40cm or shorter)
First, cut out all the pieces for the quilt itself (you will have to cut a lot of squares). I used a seam allowance of 1 cm (included in the measurements) so it would be easy to iron the seams open. Than cut the foam and the pillow parts.
After you cut all the pieces, you can set the pillow parts aside and start assembling the quilt top.
01. First you will make strips of each 10 rectangles, sewn together, like in the picture. In total you will assemble 19 of those strips. When the strips are ready, iron the seams open.
02. Sew all strips together like shown in the illustration, and iron the new seams open. Your quilt top is now ready for assembly.
After the quilt top is finished, assemble the pillow with the other pieces.
01. Fold pieces 5 like shown in the pictures, and stitch it to the zipper end, so the total length of this piece is 40 cm (if bigger, you can cut this later on).
02. Sew pieces 4 on the sides of the zipper. After this, cut excess fabric that could be there so the size of the total zipper piece is as big as piece 3.
Here you can find further explanation of the assembly of the zipper. It’s actually a tutorial for a clutch, but the zipper principle is the same.
03. Sew the zipper piece, piece 3 and pieces 2 together on the sides (seam allowance 1cm) and make a rectangle. These pieces sewn together will form the sides of the pillow.
04. Pin the side pieces to the quilt top (right sides facing each other) and sew together.
05. Open the zipper
06. Repeat step 04, attaching piece 1 to the pillow.
07. Turn the whole thing inside out through the zipper hole, insert the foam and voila, your pillow is ready to be used!
I made a rounded tot bag for my mom. She needed a purse she could carry all her music sheets in, so I made a big and sturdy purse with a zipper on the top. For the outside I used thick cotton and for the inside I used the fabric of an old dress. The handles are made from an old leather jacket. I took me a long time to make this purse because it was the first time I put a zipper in a purse like this. But I think it turned out quit nice, what do you think ?
As you might have noticed from this post, I like wood beads. This time I bought some bigger beads, to make a wood bead potholder. I used a neon yellow string with it, because I like the combination of the shouting neon with the natural and calm wood texture.
I went to the craft store and bought 15 Wood beads (diameter 30mm / about 1,2 inch) and a stretch chord. You put all 15 beads on the stretch chord and make a double loop on the end. I pulled the chord a bit so my circle would be tight enough. Then I hid the two ends in the last two beads so they weren’t visible and voila, done. A quick and simple DIY project to make a nice new design object for your dining table.
Today I tried out a tutorial from Misusu, to make a Diamond Tote Bag. Even though it took me quit a while to cut out all the triangles, and assemble them in the right order, I’m really happy with the results. If you would like to try out a diamond tote yourself, you can find it here.
For the outside of the purse I used a striped cotton. You have to puzzle the pieces together a little bit, but it’s well indicated on the pattern which directions the stripes should be on each triangle. For the bottom I used a sturdier dark blue (from the rest of the fabric of our curtains) and for the inside a lightweight, bright blue cotton (from an old table cloth). For the handles I used leather from an old jacket and the same blue cotton from the bottom of the purse.
I always have a lot of small things laying around on my night stand I want to have close to me when going to bed. This was not very pretty so I decided to do something about that! I tackled this organizational problem with two small fabric baskets, to keep all my small stuff. I didn’t use any tutorial for this, I just started cutting and sewing.
I also wanted to show you this double chained bracelet I made. It has one neon yellow bead and a tiny pink one. I think they go quit well together, what do you think ?